

Picture this: You're a DevOps engineer, coffee in hand, ready to set up cross-account access for your AWS Identity Centre users. Should be simple, right? AWS docs say "just create a trust policy," and off you go. Fast forward 8 hours later, you're questioning your life choices while staring at "Access Denied" errors that make about as much sense as pineapple on pizza.
I've been there. Last month, I spent an entire day trying to enable our development team to assume roles in our production account through Identity Centre. The official docs were about as helpful as a chocolate teapot, and most online guides were either outdated or missing critical details.
After diving deep into StackOverflow threads and AWS forums, I finally found the missing piece of the puzzle. Turns out, there's a specific ARN formatting quirk that most guides completely skip over. Let me walk you through the complete setup so you don't have to suffer like I did.
What we're building (and why it matters)

Think of cross-account access like having a master key that works across different buildings in your office complex. Without it, your developers would need separate credentials for every AWS account - dev, staging, production, sandbox. That's not just inconvenient; it's a security nightmare waiting to happen.
Here's what we're setting up:
- Identity Account: Where your AWS Identity Centre lives (the "keymaker")
- Target Account: Where your developers need access (the "building they want to enter")
- Trust Bridge: The secure connection between them (the "magic hallway")
By the end of this guide, your users will be able to:
- Log into Identity Centre in Account A
- Seamlessly assume roles in Account B
- Access resources without juggling multiple sets of credentials
- Sleep better at night knowing your security model actually makes sense
Prerequisites to cross-account assumeRole access setup
Before we dive into the fun stuff, this is the boring but essential stuff, make sure you have:
Identity Centre Setup
✅ AWS Identity Centre enabled in your management account
✅ At least one permission set created
✅ Users assigned to the permission set
✅ Basic familiarity with IAM policies
Target Account Access
✅ Administrative access to the target AWS account
✅ Ability to create IAM roles and policies
✅ Clear understanding of required permissions
✅ Network requirements validated
☕ Coffee Requirements
✅ At least one cup of your preferred caffeinated beverage
✅ Patience levels set to "dealing with AWS documentation"
Understanding the Identity Centre ARN maze
Here's where things get spicy. When AWS Identity Centre creates roles in your accounts, it follows a specific naming pattern. These roles get ARNs that look like this:
arn:aws:iam::123456789012:role/aws-reserved/sso.amazonaws.com/us-east-1/AWSReservedSSO_DeveloperAccess_1234567890abcdefBut here's the kicker - and this is what cost me a day of my life - the ARN format changes depending on your AWS region. According to AWS official documentation: "If your identity source in IAM Identity Center is hosted in us-east-1, there is no aws-region in the ARN." Sometimes you get the region in the path, sometimes you don't.

The step-by-step setup guide
Step 1: Create the IAM role in your target account
First, let's create the role that your Identity Centre users will assume. Think of this as creating the "guest room" in your target account.
# Using AWS CLI
aws iam create-role \
    --role-name IdentityCentreCrossAccountRole \
    --assume-role-policy-document file://trust-policy.json \
    --description "Role for Identity Centre cross-account access"
But wait - what goes in that trust-policy.json file? This is where the magic (and frustration) happens.
Step 2: The trust policy that actually works
Here's the trust policy that took me forever to figure out. Pay attention to the ARN patterns - this is the secret sauce:
{
    "Version": "2012-10-17",
    "Statement": [
        {
            "Effect": "Allow",
            "Principal": {
                "AWS": "arn:aws:iam::YOUR-IDENTITY-CENTRE-ACCOUNT:root"
            },
            "Action": "sts:AssumeRole",
            "Condition": {
                "ArnLike": {
                    "aws:PrincipalArn": [
                        "arn:aws:iam::YOUR-IDENTITY-CENTRE-ACCOUNT:role/aws-reserved/sso.amazonaws.com/*/AWSReservedSSO_YOUR-PERMISSION-SET-NAME_*",
                        "arn:aws:iam::YOUR-IDENTITY-CENTRE-ACCOUNT:role/aws-reserved/sso.amazonaws.com/AWSReservedSSO_YOUR-PERMISSION-SET-NAME_*"
                    ]
                }
            }
        }
    ]
}
⚠️ Notice the two ARN patterns?
This isn't a typo or me being overly cautious. You need BOTH patterns because AWS uses different ARN formats depending on your Identity Centre region:
- First pattern (
*/AWSReservedSSO_...): For Identity Centre instances in regions other than us-east-1 - Second pattern (
AWSReservedSSO_...): For Identity Centre instances in us-east-1 where AWS omits the region from the ARN
As noted in the AWS documentation: "If your identity source in IAM Identity Center is hosted in us-east-1, there is no aws-region in the ARN." This is confirmed by AWS community discussions where developers have discovered this regional difference.
It's like having both a regular key and a master key - you never know which door you'll encounter.
Step 3: Replace the placeholders (don't just copy-paste)
{
    "Version": "2012-10-17",
    "Statement": [
        {
            "Effect": "Allow",
            "Principal": {
                "AWS": "arn:aws:iam::111111111111:root"
            },
            "Action": "sts:AssumeRole",
            "Condition": {
                "ArnLike": {
                    "aws:PrincipalArn": [
                        "arn:aws:iam::111111111111:role/aws-reserved/sso.amazonaws.com/*/AWSReservedSSO_DeveloperAccess_*",
                        "arn:aws:iam::111111111111:role/aws-reserved/sso.amazonaws.com/AWSReservedSSO_DeveloperAccess_*"
                    ]
                }
            }
        }
    ]
}| Placeholder | Replace With |
|---|---|
111111111111 |
Your Identity Centre account ID |
DeveloperAccess |
Your permission set name |
Step 4: Attach permissions to your role
Now give your role some actual permissions. This is like deciding what rooms in the building your guests can access:
{
    "Version": "2012-10-17",
    "Statement": [
        {
            "Effect": "Allow",
            "Action": [
                "s3:GetObject",
                "s3:PutObject",
                "ec2:DescribeInstances",
                "rds:DescribeDBInstances"
            ],
            "Resource": "*"
        }
    ]
}
Attach this policy to your role:
aws iam attach-role-policy \
    --role-name IdentityCentreCrossAccountRole \
    --policy-arn arn:aws:iam::aws:policy/ReadOnlyAccess

# Or attach your custom policy
aws iam put-role-policy \
    --role-name IdentityCentreCrossAccountRole \
    --policy-name CrossAccountPermissions \
    --policy-document file://permissions-policy.json
Step 5: Update your Identity Centre permission set
In your Identity Centre account, update your permission set to allow assuming external roles:
{
    "Version": "2012-10-17",
    "Statement": [
        {
            "Effect": "Allow",
            "Action": "sts:AssumeRole",
            "Resource": "arn:aws:iam::222222222222:role/IdentityCentreCrossAccountRole"
        }
    ]
}
Where 222222222222 is your target account ID.
Testing your setup (the moment of truth)
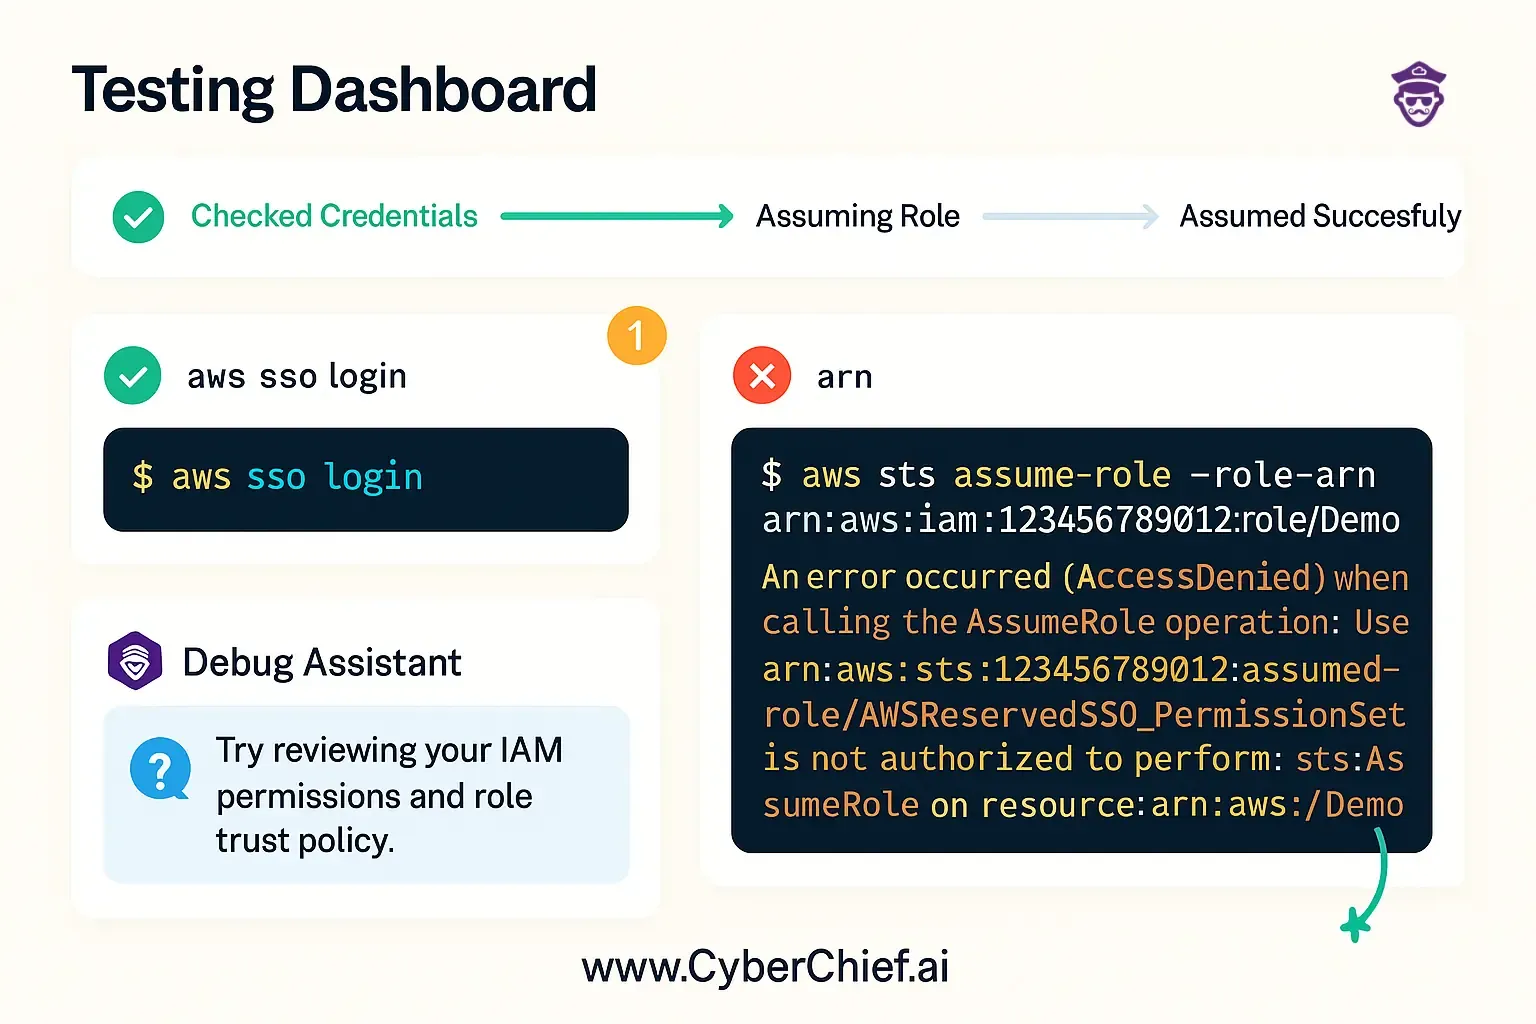
Method 1: AWS CLI test
# First, log in through Identity Centre
aws sso login --profile your-identity-centre-profile

# Try to assume the cross-account role
aws sts assume-role \
    --role-arn arn:aws:iam::222222222222:role/IdentityCentreCrossAccountRole \
    --role-session-name test-cross-account-access \
    --profile your-identity-centre-profile
Method 2: AWS Console test
Step 1: Log into the AWS Console through Identity Centre
Step 2: Try to switch roles using the role ARN
Step 3: If successful, you should see the target account name in the top-right corner
If the CLI test works, you'll get back temporary credentials. If it fails, welcome to the debugging club - membership is mandatory but not fun.
Troubleshooting common cross-account IAM assumeRole issues
(Because things always go wrong!)
This is like the "PC LOAD LETTER" of AWS errors - frustratingly vague. Here's what to check:
Check your ARN patterns:
# List actual roles created by Identity Centre
aws iam list-roles --query 'Roles[?contains(RoleName, `AWSReservedSSO`)].{RoleName:RoleName,Arn:Arn}'
Compare the actual ARNs with your trust policy patterns. If they don't match, you found your problem.
Verify account IDs:
# Double-check your account ID
aws sts get-caller-identity --query Account --output text# Check if the role exists
aws iam get-role --role-name IdentityCentreCrossAccountRoleIf this fails, your role creation didn't work. Start over from Step 1.
This usually means your trust policy is malformed. Validate your JSON:
# Test JSON syntax
cat trust-policy.json | python -m json.tool
Common pitfalls (learn from my mistakes)
🌍 The us-east-1 special case
AWS has different ARN formatting for us-east-1 compared to other regions. If your Identity Centre is in us-east-1, the ARN won't include the region. This is why you need both ARN patterns in your trust policy. According to AWS documentation, this is the standard behavior for the us-east-1 region.
🔄 Permission set name changes
If you rename a permission set in Identity Centre, the underlying role ARN changes too. Your trust policy will break faster than a new year's resolution.
🔤 Case sensitivity matters
AWS ARNs are case-sensitive. DeveloperAccess ≠ developeraccess. Triple-check your casing.
🌐 Regional constraints
Some AWS services have regional limitations. Make sure your target resources are in regions that support your use case.
Wrapping up AWS Identity Centre cross-account IAM access...
Setting up cross-account access with AWS Identity Centre doesn't have to be a day-long adventure in frustration. The key is understanding the ARN formatting quirks and having the right trust policy patterns.
🏆 Remember the golden rules:
- Always use both ARN patterns in your trust policy (with and without the region)
- Test your setup before declaring victory
- Follow the principle of least privilege - give only the permissions you need
- Monitor and log all cross-account activities
- Automate where possible - your future self will thank you
The next time you need to set this up, bookmark this guide. Or better yet, turn it into a Terraform module and never think about it again.
Now go forth and assume roles like the cloud wizard you are! And remember, if all else fails, there's always that one StackOverflow answer that somehow has the exact solution you need. 🧙♂️
Stop wrestling with AWS permissions security
...let Cyber Chief's Raider CSPM handle your entire cloud security posture
Remember that frustrating day I spent debugging AWS Identity Centre ARN patterns? That's exactly the kind of time-wasting security headache that Cyber Chief's Raider CSPM eliminates.
The Raider CSPM difference:
- Instant misconfiguration detection - Catches missing ARN patterns before they become day-long debugging sessions
- <10 minute integration - Works with Jenkins, GitHub, GitLab, Azure DevOps out of the box
- Built for developers - Even without security expertise, your team gets step-by-step fixes
- CI/CD native - Scans run automatically as part of your development workflow
Business impact that matters:
- 25+ compliance frameworks (CIS, NIST, PCI-DSS, SOC2, HIPAA) automated
- Customer trust - "I've been using Cyber Chief scans to show B2B prospects our software is enterprise-ready"
- No security team needed - On-demand coaching from AppSec experts
One Cyber Chief customer said:
I've had pen test reports before where it would just take us weeks to fix vulnerabilities, but here, usually within a few minutes I know what to do. Very fast!
Instead of debugging AWS permissions manually, get instant alerts with remediation guidance.
Watch the on-demand demo and eliminate cross-account permission headaches forever. Your future self will thank you.
Because life's too short to debug AWS trust policies manually.